
Weidmüller u-OS Data Hub
Dieser Inhalt ist noch nicht in deiner Sprache verfügbar.
The Weidmüller connector enables bidirectional data exchange between your logiccloud runtime and the Weidmüller u-OS Data Hub. You can publish PLC variables to the hub (provider) and subscribe to hub variables (consumer).
Prerequisites
Section titled “Prerequisites”Before creating a Weidmüller connection, you need:
- A Weidmüller u-OS device with the Data Hub enabled
- OAuth2 client credentials configured in the u-OS Control Center (Identity & access → Clients)
- The exact client name as shown in Control Center
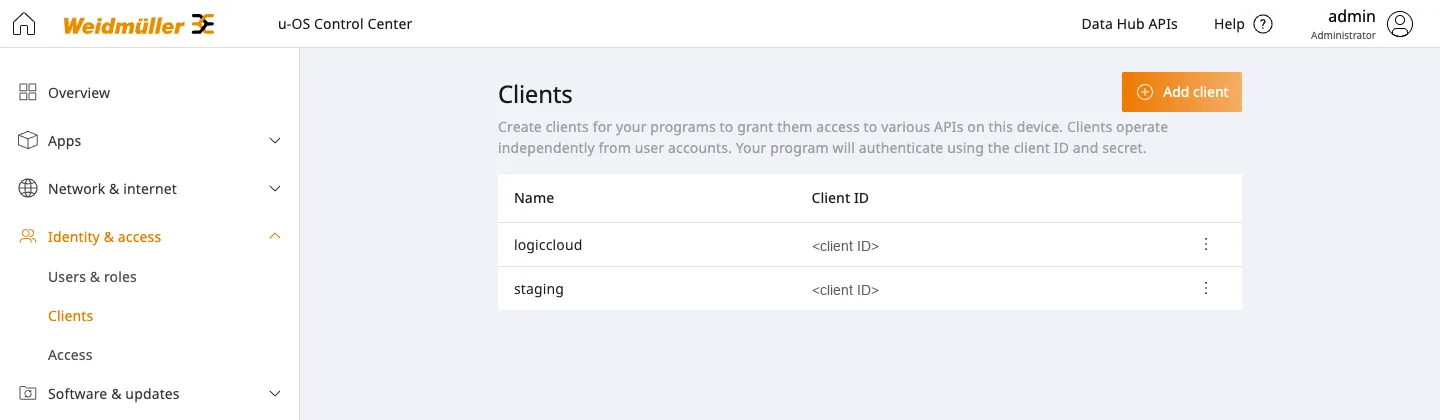
Clients live in the device’s u-OS Control Center → Identity & access → Clients. Each has a Name and a Client ID; the Name column is the value the connector’s Client name field must match.
Creating the client
Section titled “Creating the client”Press Add client and give it a Client name. The device states the rule
beside the field: lower case a-z, 0-9 and _ are allowed, it must start with
a letter, and it must not end with _.
Then tick the permissions the connector needs, under Variable HTTP API permissions:
| Permission | Needed for |
|---|---|
| Read Hub variables | A consumer, which subscribes to hub variables |
| Provide Hub variables | A provider, which publishes to the hub |
| Read-and-write Hub variables | Mappings that write back to the hub (Mode To hub) |
The Administration of API permissions below them — system information, logs, network, security and update settings — are not used by the connector. Leave them unticked.
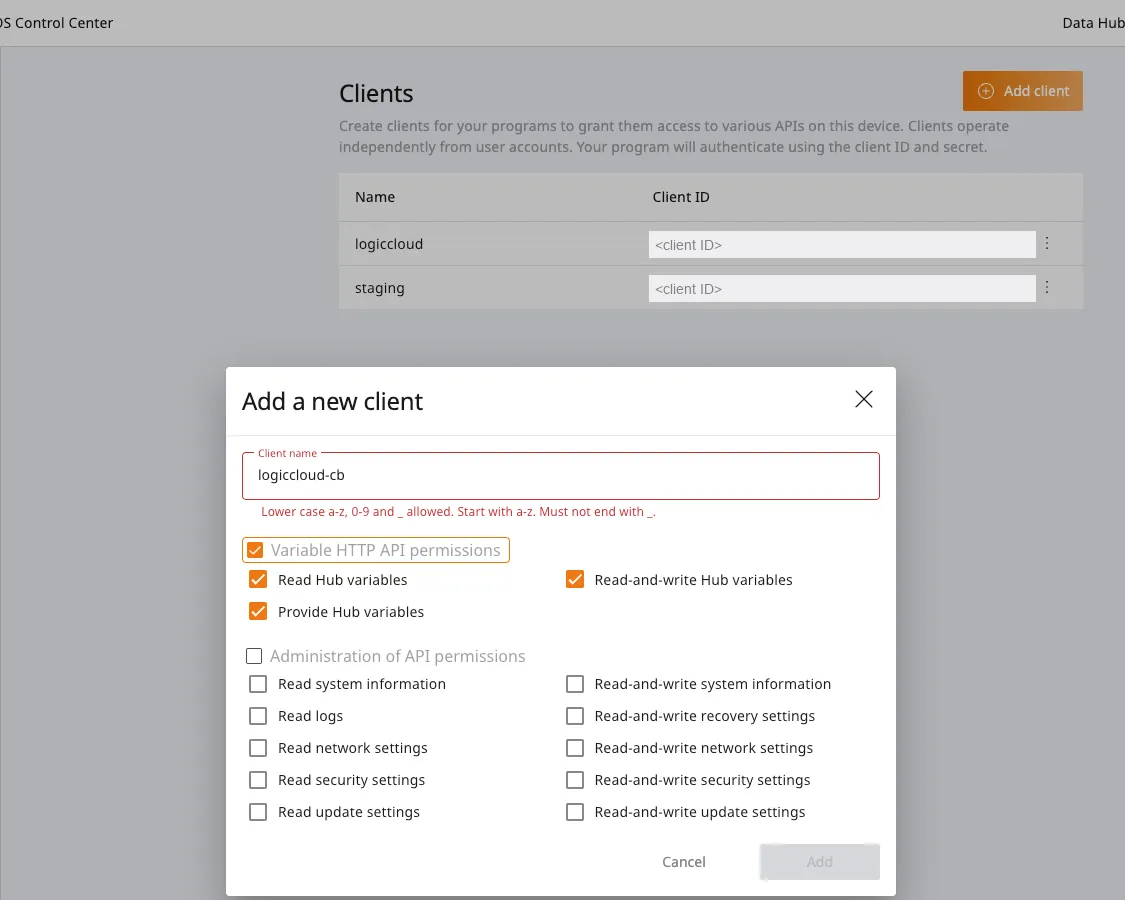
u-OS shows the client secret once, when the client is created. Copy it then — you need it for the connection, and it cannot be read back afterwards.
Create a Weidmüller Connection
Section titled “Create a Weidmüller Connection”- In your project, navigate to the Runtimes section
- Select your runtime and expand Connections
- Click Add connection and select Weidmüller
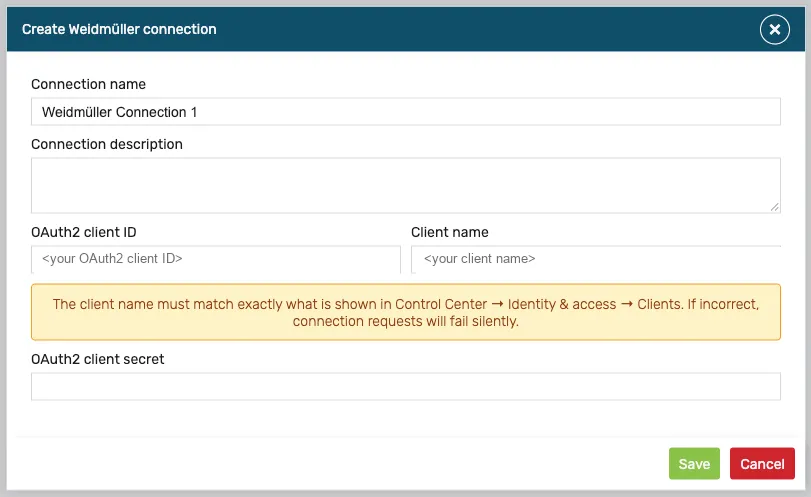
- Fill in the connection details:
| Field | Description |
|---|---|
| Connection name | A descriptive name for the connection |
| Connection description | Optional free text |
| OAuth2 client ID | The client ID from u-OS Control Center |
| Client name | The exact client name from u-OS Control Center |
| OAuth2 client secret | The client secret |
There is no token-endpoint field: the edge derives it itself.
- Click Save to create the connection
Add a Provider (Publish to Hub)
Section titled “Add a Provider (Publish to Hub)”Providers publish PLC runtime variables to the u-OS Data Hub, making them available to other systems.
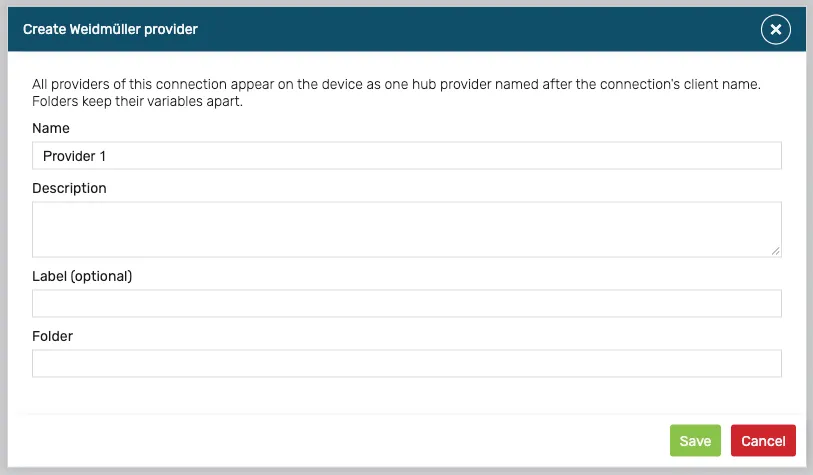
- Right-click the connection and select Add Provider
- Configure the provider:
| Field | Description |
|---|---|
| Name | A descriptive name for the provider |
| Description | Optional free text |
| Label (optional) | Optional label for the provider |
| Folder | Optional prefix for variable addresses (dot-separated) |
- Click Save
Hub Provider Name Rules
Section titled “Hub Provider Name Rules”The name the hub sees comes from the connection’s Client name, so that value must follow the u-OS naming grammar:
- Lower case letters (
a-z), digits (0-9) and underscores (_) only - Must start with a letter
- Must not end with an underscore
- No dots, dashes, spaces or upper case letters
Valid: plc, weather_station, line1_sensors
Invalid: PLC, plc-1, plc.line1, 1plc, plc_
u-OS enforces this as you type: the rule appears beside the Client name field when the value does not satisfy it.
Add a Consumer (Subscribe from Hub)
Section titled “Add a Consumer (Subscribe from Hub)”Consumers subscribe to u-OS Data Hub variables and write them to PLC runtime variables.
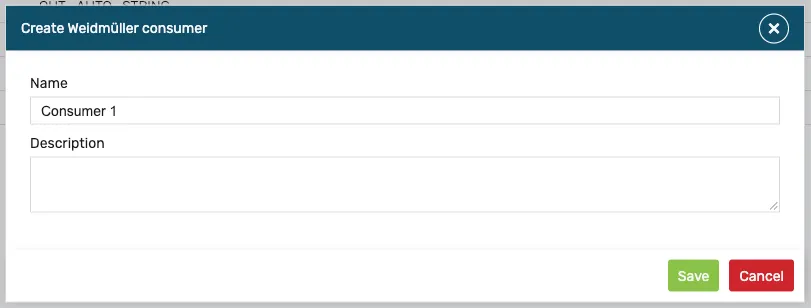
- Right-click the connection and select Add Consumer
- Give the consumer a Name and, optionally, a Description
- Click Save
A consumer has no Label or Folder: those belong to providers, which publish.
Browse the Data Hub
Section titled “Browse the Data Hub”Instead of typing addresses by hand, you can browse the address space the device actually reports and pick the variables you want.
- Select the provider or consumer
- Click Browse
- Expand the folders and select one or more variables
- Confirm — the IDE adds one mapping row per selected variable
The Browse Tree
Section titled “The Browse Tree”The tree mirrors the folder model the hub reports. A dotted variable key such as
digital_nameplate.address_information.city_town becomes one tree level per
segment, so related variables stay grouped instead of appearing as one long flat
list.
Folders and values are distinguished by what the device reports, not guessed:
- Folders can be expanded and contain other nodes.
- Values are the variables you can map.
A folder has no address of its own, so selecting one adds no mapping row. Select the values inside it instead.
What a Selected Variable Fills In
Section titled “What a Selected Variable Fills In”| Column | Filled with |
|---|---|
| Variable Name | The full dotted key of the variable |
| Address | The bare dotted key — the only form the hub accepts |
| Type | The data type the device reports, defaulting to Bool if it reports none |
| Mode | From hub |
| Provider | The hub provider that owns the variable, when the device reports one |
Variable Name is the full dotted key rather than only the last segment. Two
variables named city_town in different folders therefore stay distinct instead
of collapsing onto a single row.
The Provider is kept as its own field and is never joined onto the address. Leave it empty to inherit the endpoint’s Provider ID — see Per-Mapping Provider Override.
Access Levels and Mode
Section titled “Access Levels and Mode”The hub reports whether each variable is read-only or read/write, and the Mode dropdown follows:
| The device reports | Mode offers |
|---|---|
| Read-only | From hub only |
| Read/write | From hub and To hub |
Writing to a read-only hub variable cannot succeed, so To hub is not offered
for one — this prevents a mapping that fails silently at runtime.
Two details worth knowing:
- A browsed row always defaults to
From hub, even when the variable is writable. Write access only unlocks theTo huboption; it does not preselect it. - A row you author by hand keeps both options, because nothing has told the IDE what that address supports.
Quality and Timestamp
Section titled “Quality and Timestamp”The browse tree does not offer $quality or $timestamp entries. They are not
variables you can map. Use the Quality Variable and Timestamp Variable
fields on the mapping instead — see
Quality and Timestamp Metadata.
Add Mappings
Section titled “Add Mappings”Mappings connect PLC variables to u-OS Data Hub variables.
- Select the provider or consumer
- Click Add Mapping
- Configure each mapping:
| Field | Description |
|---|---|
| Variable Name | The PLC runtime variable |
| Address | The hub variable address (dot-separated path) |
| Type | Data type: Bool, Int, Float64, String, etc. |
| Mode | Direction: From hub (subscribe) or To hub (publish) |
| Provider | Optional: override the endpoint’s provider ID for this mapping |
| Quality Variable | Optional: PLC variable for quality metadata |
| Timestamp Variable | Optional: PLC variable for timestamp metadata |
Address Format
Section titled “Address Format”The hub variable address uses dot-separated segments:
Valid: temperature, line1.temp1, sensors.out.temp1
Invalid: 1temp, temp-1, temp/out
Folder Prefix
Section titled “Folder Prefix”When you set a Folder on the provider/consumer, it is automatically prepended to each mapping’s address:
| Folder | Mapping Address | Effective Address |
|---|---|---|
sensors.out | temp1 | sensors.out.temp1 |
plc.values | temperature | plc.values.temperature |
| (empty) | line1.sp1 | line1.sp1 |
This allows organizing variables hierarchically without repeating the prefix in every mapping.
Data Types
Section titled “Data Types”| Type | Description |
|---|---|
Bool | Boolean (true/false) |
Int | 32-bit signed integer |
Int64 | 64-bit signed integer |
Float32 | Single-precision floating point |
Float64 | Double-precision floating point |
String | UTF-8 text |
Duration | Time duration value |
Timestamp | Date/time timestamp |
Per-Mapping Provider Override
Section titled “Per-Mapping Provider Override”By default, all mappings in a provider/consumer use the endpoint’s Provider ID. You can override this per-mapping to publish/subscribe to a different hub provider:
- In the mapping row, set the Provider field to a different provider ID
- Leave it empty to inherit from the endpoint
This allows a single consumer to subscribe to variables from multiple hub providers.
Quality and Timestamp Metadata
Section titled “Quality and Timestamp Metadata”Each mapping can optionally capture metadata reported by the u-OS Data Hub:
| Field | Description |
|---|---|
| Quality Variable | A PLC variable that receives the hub-reported signal quality indicator. Useful for detecting stale or invalid data. |
| Timestamp Variable | A PLC variable that receives the hub-reported timestamp of the last value update. Useful for diagnostics and data synchronization. |
These fields are optional. When configured, the edge runtime automatically populates them with metadata from the hub alongside the actual variable value.
Send and Receive Data
Section titled “Send and Receive Data”The sections above describe each field on its own. This is the whole task, end to end.
Data always travels between a PLC variable in your program and a hub variable on the device. A mapping is the link between the two, and its Mode says which way the value moves.
1. Declare the PLC variables
Section titled “1. Declare the PLC variables”A mapping can only use a variable your program exposes. Declare it in the PLC
code with the {IN} or {OUT} attribute, according to the direction you want:
| Declared as | Becomes | Use it to |
|---|---|---|
{IN} | an Input | receive a value from the hub |
{OUT} | an Output | send a value to the hub |
2. Refresh Inputs/Outputs
Section titled “2. Refresh Inputs/Outputs”Open the runtime’s Inputs/Outputs and press Refresh. Newly declared variables appear only after this — the list does not update by itself.
3. Add a provider or a consumer
Section titled “3. Add a provider or a consumer”- To send data, add a provider. It publishes your PLC variables to the hub.
- To receive data, add a consumer. It subscribes to hub variables and writes them into your PLC variables.
4. Create the mappings
Section titled “4. Create the mappings”In the provider or consumer, add a mapping for each variable. Two shortcuts save typing:
- Browse picks the hub side — it fills Address, Type and Provider from what the device reports. See Browse the Data Hub.
- Advanced fill picks the PLC side — it opens Fill - Inputs/Outputs and creates a row per selected variable.
Advanced fill sets Mode from the variable’s direction: an Output becomes
To hub, an Input becomes From hub. That is almost always what you want,
and you can change it in the Mode column.
5. Deploy and check
Section titled “5. Deploy and check”Save the mappings, then build and deploy the runtime. Data starts moving once the runtime is running.
To confirm it, use the device’s own Data Hub Browser, below.
Check the Data on the Device
Section titled “Check the Data on the Device”The device has its own u-OS Data Hub Browser, reached from the u-OS home
page or directly at https://<DEVICE IP>/u-os-hub/. It lists every variable on
the hub and shows each one’s current value, so it is the quickest way to confirm
that a provider is publishing or that a consumer has something to read.
Select a variable in the tree and the right-hand pane shows it in full.
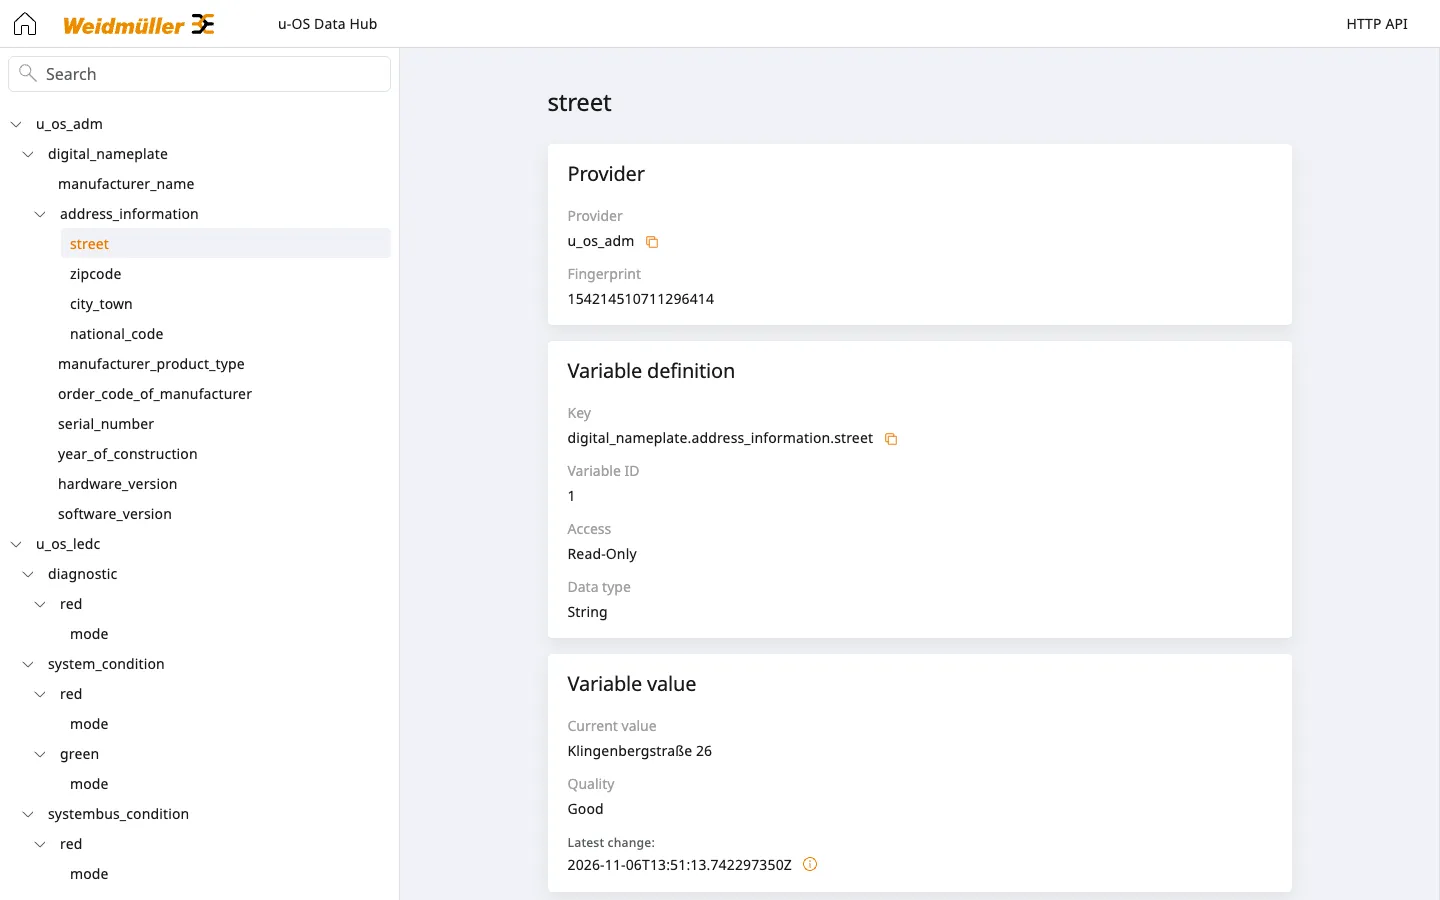
Every field there corresponds to something in this page:
| In the Data Hub Browser | In logiccloud |
|---|---|
| Provider | The hub provider — named after your connection’s Client name |
| Key | The mapping Address — the bare dotted key |
Access (Read-Only / Read-Write) | What the device reports, and therefore whether To hub is offered in Mode |
| Data type | The mapping Type |
| Current value | What your provider published, or what a consumer reads |
| Quality | What a Quality Variable receives |
| Latest change | What a Timestamp Variable receives |
So if a mapping is not behaving as expected, this view answers three questions at once: whether the variable exists at all, whether the device considers it writable, and whether its value is actually changing.
Troubleshooting
Section titled “Troubleshooting”Connection times out silently
Section titled “Connection times out silently”Cause: The Client Name doesn’t match exactly what’s in u-OS Control Center.
Solution:
- Open u-OS Control Center → Identity & access → Clients
- Copy the exact client name (case-sensitive)
- Update the connection in logiccloud
”providerId is not a valid hub provider name”
Section titled “”providerId is not a valid hub provider name””Cause: The Provider ID contains invalid characters.
Solution: Use only lowercase letters, digits, and underscores. Must start with a letter.
Variables not appearing in the hub
Section titled “Variables not appearing in the hub”Possible causes:
- Provider not registered (check edge device logs)
- Address doesn’t match the
VariableNamegrammar - OAuth2 token expired or invalid
Solution:
- Check the edge device logs for registration errors
- Verify the address uses only valid characters (letters, digits, underscores, dots)
- Verify OAuth2 credentials are correct
Mappings are empty after deployment
Section titled “Mappings are empty after deployment”Cause: Mappings weren’t saved correctly.
Solution: Re-open the provider/consumer, verify mappings are listed, and save again.
A browsed item added no mapping row
Section titled “A browsed item added no mapping row”Cause: The selected node has no mapping address. Folders are the usual case — they group variables but are not variables themselves.
Solution: Expand the folder and select the values inside it. If a value is skipped as well, the device reported no address for it; check the edge device logs.
To hub is missing from the Mode dropdown
Section titled “To hub is missing from the Mode dropdown”Cause: The hub reported that variable as read-only, so only From hub is
offered. Writing to it could not succeed.
Solution: If the variable should be writable, correct its access type in u-OS, then browse again so the IDE picks up the new access level.